Archive | June 2013

4th of July Poke Cake

Final Cake

With 4th of July just around the corner, I thought it would be fun to take a spin on the traditional poke cake and make it a little more patriotic. Poke cake’s are very easy and great for hot summer days. They involve baking a cake from a box, poking holes all over the cake, pouring jell-o all over the cake, and chilling it in the fridge for a few hours. You can use pretty much any kind of cake mix and jell-o flavor so it’s easy to mix it up and have fun with it. The result is so yummy and since the cake is nice and chilly it is so refreshing after a long day in the heat.

NOTE: This cake is super simple but does take several hours for the jell-o to chill so plan to make in the morning or a day ahead of time.

Ingredients:

  • 1 white cake mix (And ingredients to prepare the boxed cake, which is typically egg whites, vegetable oil, and water)
  • 1 pint blueberries
  • 1 small box strawberry jell-o
  • 1 cup boiling water
  • 1/2 cup cold water
  • 1 8 oz. tub Cool Whip
  • 1 16 ounce container strawberries

Directions: 

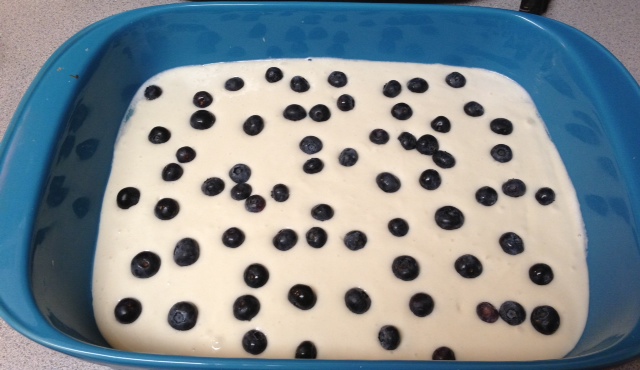
1. Prepare cake mix according to the directions and pour batter into pan. Sprinkle with blueberries, reserving a handful for the “stars” in the the flag. Bake cake according to directions on box.

Blueberry Batter

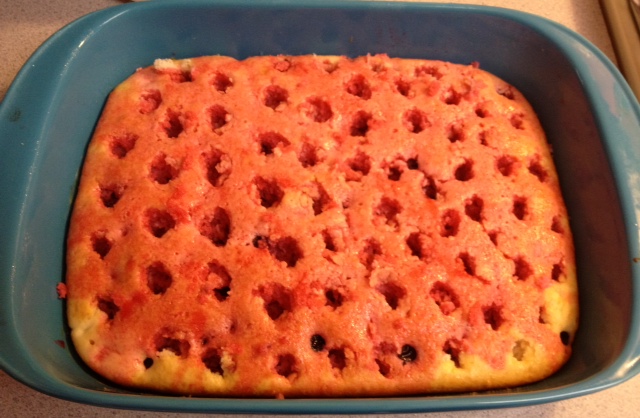
2.  After cake has cooled for 15 minutes, take the end of a round spatula and poke holes all over the cake. (I don’t suggest using a fork. That’s what I did the first time and the jello didn’t spread evenly).

Poked Cake

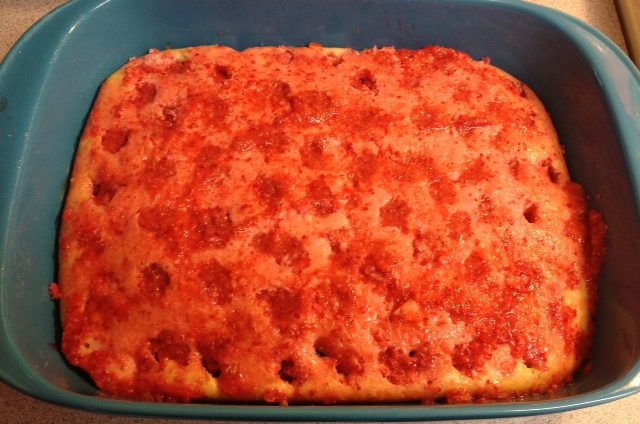
3. In a small bowl, mix jell-o with hot water. Add cold water and stir. Pour all over cake. Chill for 3 hours.

Jello on cake

4. Set aside several strawberries for your flag (about 1 cup). In a food processor or blender,   purée remaining strawberries. Spread evenly over the cake.

Strawberry over cake

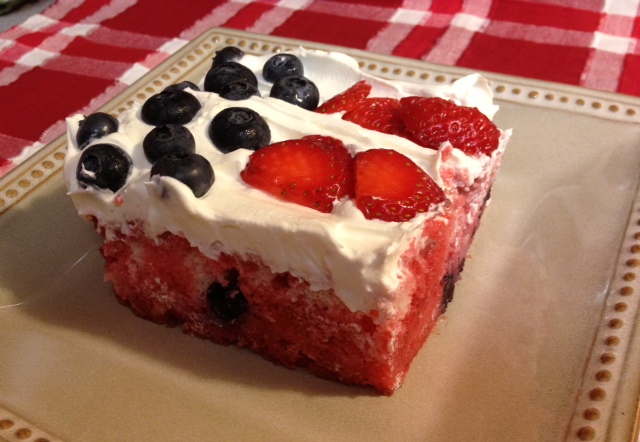
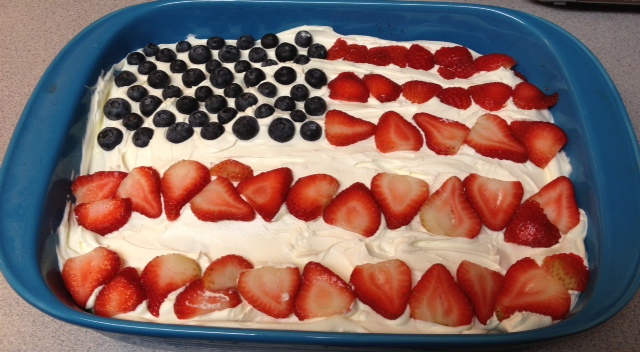
5. Slice remaining strawberries thinly. Frost cake with Cool Whip and using remaining blueberries and strawberry slices, decorate cake as an American flag, using blueberries for the “stars” and strawberry slices as the “stripes”.

Final Cake

Happy 4th of July!

Final Slice

Pizzeria Garlic Knots

Plated Knots

I love baking garlic bread to go along Italian dishes and these homemade garlic knots are my favorite. They’re very simple, kids love to help with knotting the dough, and they taste just as good as any Italian restaurant or pizzeria’s garlic bread and tons better than the frozen stuff. They also make a great appetizer when served with marinara for dipping. Warning: these disappear quickly so consider a double or triple batch. 🙂

I’ve included both the bread machine and by hand directions below.

Pizzeria Garlic Knots
Makes 24 knots

Dough:

  • 3/4 cup warm water
  • 1 packet active dry yeast
  • 1 3/4 cups bread flour
  • 1 tablespoon olive oil
  • 1 teaspoon salt
  • 1 teaspoon dry Italian seasoning
  • 1 tablespoon sugar

Garlic Butter

  • 4 tablespoons butter
  • 4 cloves garlic, minced
  • 1/4 cup parsley, finely chopped
  • 1 teaspoon salt

Bread Machine Directions:

If using a bread machine, add the ingredients as recommended by your bread machine and set to dough setting. Continue with “Making the knots” (below):

Risen dough

By Hand Directions: 

In a small bowl, add the warm water and sugar and mix. Add the yeast and let rest for 5 minutes. In a large bowl, whisk together flour, olive oil, salt, and Italian seasoning. Make a small well in the center of the four mixture and pour in the yeast water. Mix and then knead together for 5-10 minutes. Form the dough into a ball, lightly coat with olive oil, and place in a covered dish to allow to rise (approximately 1 1/2 hours).

Making the knots: 

After your dough has finished rising, grab a handful of dough at a time and roll out on a floured surface. Roll to a small rectangle, about 4 inches long and 1/2 an inch thick.

Rolled dough

Using a pizza cutter, make 1 inch strips.

Strips

Take each strip and tie to make a knot.

Knotting


Knotted

Lay on a greased baking tray and leave plenty of space in between so that the knots can rise a second time.

Knots on a tray

Cover pan of knots with seran wrapped sprayed with olive oil and let rise until doubled in size (about two hours).

Second rise

After knots have finished rising, preheat oven to 400°F.

Remove seran wrap and bake knots for 12 minutes or until golden brown. Remove from oven to cool.

Browned knots

While knots are cooling, melt the butter in a medium saucepan and add garlic. Heat on low for 2-3 minutes then add salt and parsley and remove from heat.

Garlic Butter

Generously brush garlic butter onto the still warm knots. I just pile all the finished knots onto one tray and brush away.

Garlic Brushing

Enjoy!

Plated Knots

Crock Pot Steak Stroganoff

FinisheddIf you own a crock pot and are short on time then you’re going to love, love, love this recipe for easy Steak Stroganoff. I threw it together one morning when I was rushing to get out the door and had maybe 10 minutes to prep everything. I just dumped it all in my crock pot and flew out the door. When I came home that evening I was shocked and amazed at how good it turned out. When I say good, I mean really stinkin’ good! Tom kept saying over and over again, “Honey, this is amazing!” and all but licked his plate clean.
This is also a very economical meal! By using cube steak, a cheaper cut of meat, you save a bundle and the crock pot magically transforms this tougher cut of meat it into a melt-in-your-mouth delicious steak which your guests will swear was a Choice cut.

Crock Pot Steak Stroganoff
Serves 6-8

  • 2 pounds cube steak
  • 8 ounces sliced fresh mushrooms
  • 1 medium onion, sliced
  • 1 packet dry onion soup mix
  • 1 packet dry mushroom beef soup mix
  • 1 large can (26 ounce) cream of mushroom soup
  • 1 cup water
  • 3/4 cup sour cream

Instructions:

1. Place the steak in the bottom of the crock pot.

Raw Steak

2. Layer sliced onions and mushrooms on top of meat.
3. In a medium bowl, mix together the dried soup mixes, cream of mushroom soup, and water. Pour over meat, mushrooms, and onions.

Sauce


Pour over meat

4. Turn on crock pot and set for 8 hours on Low or 4-5 hours on High.
5. When read to serve, turn off crock pot and stir in sour cream.

Finished

6. Serve over rice, boiled potatoes, or egg noodles. Enjoy!

Finished

Reuben Ring

My Dad and I were chatting the other day about favorite family recipes and my Mom’s Reuben Ring came up. We immediately started reminiscing about that delicious recipe my Mom discovered at a Pampered Chef party she went to. It has all the amazing flavors of a Reuben sandwich—corned beef, tangy thousand island dressing, and sauerkraut—but instead of plain bread it’s wrapped up in a flakey crust. There was even one hot summer night where several families met at a musical in the park and my Mom baked and carefully transported a Reuben ring for dinner in the park. We remembered it tasting better than ever before and being gobbled up in no time at all. Some recipes have a wonderful way of becoming family memories and my Mom’s Reuben Ring is certainly one of them! Here is her adapted recipe originally created by The Pampered Chef.

Reuben Ring

Reuben Ring

Ingredients: 

  • 3/4 cup thousand island dressing
  • 4 ounces cream cheese, softened
  • 2 cups sliced deli corned beef, chopped
  • 1 (11 ounce) can sauerkraut, drained (Make sure to squeeze out any excess liquid)
  • 1 1/2 cups Swiss cheese, shredded (reserve 1/2 cup for sprinkling on top prior to baking)
  • 3 tablespoons fresh parsley, chopped
  • 1 teaspoon garlic powder
  • 1/2 teaspoon salt
  • 1/4 teaspoon pepper
  • 2 (8 ounce) cans crescent rolls
  • 1 egg, beaten

Directions

Preheat oven to 375°F.

In a medium bowl, mix together cream cheese and thousand island dressing.

Thousand Island

Add the corned beef, sauerkraut, 1 cup of Swiss cheese, parsley, garlic powder, salt, and pepper. Mix together until evenly blended. Set aside.

Filling Mixture

Spray a baking sheet with non-stick spray. To create the ring, I suggest laying a small bowl in the center of the baking sheet to use as a guide.

Cereal Bowl


Remove crescent rolls from package and separate into triangles. Lay 8 of the triangles around the bowl with the base of the triangle laid along the bowl and the points of the triangle going outward.

First layer of triangles


Take the remaining 8 triangles and lay in between the triangles.

2nd layer of triangles


Remove the bowl and spoon the filling mixture along the thick interior.

Filling laid out


Fold the points over and pinch on to the inside of the ring.

Ring


Brush with the beaten egg, sprinkle remaining 1/2 cup of cheese on top, and bake for 25-30 minutes or until the crescent dough is golden and crispy.

Reuben Ring

Now that looks pretty enough to hang on your door…or eat for dinner! 😛

Reuben Ring

Dark Chocolate Cherry Oatmeal Cookies

If you like chewy oatmeal cookies then you’ll love this recipe which incorporates dark chocolate chips, dried cherries, and walnuts. The flavors work really well together and make for a very tasty cookie!

Plated Cookies

Dark Chocolate Cherry Oatmeal Cookies
Makes 2 dozen cookies

Ingredients:

  • 1/2 cup butter, softened
  • 1/4 cup white sugar
  • 1/2 cup packed dark brown sugar
  • 1 eggs
  • 2 teaspoons vanilla extract
  • 2/3 cup all-purpose flour
  • 1/2 teaspoon baking soda
  • 1/2 teaspoon salt
  • 1 & 2/3 cups quick-cooking oats
  • 3/4 cup chopped walnuts
  • 1/2 cup dark chocolate chips
  • 1/2 cup dried cherries

Directions:

Preheat oven to 325°F.

In a medium bowl, cream together the sugars and butter.

Sugar and butter

Add egg and vanilla and beat. Whisk in flour, baking soda, and salt and beat until well blended.

Blended Dough

Stir in the oats, walnuts, chocolate chips and cherries.

Finished Dough

Using a cookie scoop or a large spoon, scoop spoonfuls of cookie dough onto a greased cookie sheet.

Cookies on cookie sheet

Bake for 13 minutes or until cookies are chewy in the center and crispy on the edges.

Note: With any cookie recipe, I strongly recommend you bake one cookie all by itself to test out the exact baking time for your oven. It’s a lot better to pitch one burnt cookie than an entire pan. I’ve learned this lesson the hard way!

Plated Cookies

Lemon Shrimp Linguine

This recipe pushes all the right flavor buttonslemon, garlic, herbs, and buttery shrimp with just a hint of heat. It comes together very quickly and is on the table in no time. This refreshing shrimp pasta is perfect for a date night in or for sharing with guests over a bottle of wine and some crusty garlic bread.

Plated Lemon Shrimp Linguine

Lemon Shrimp Linguine
Serves 2

Ingredients:

  • 9 ounces linguine
  • 2 tablespoons olive oil
  • ½ cup diced onion
  • 4 garlic cloves, minced
  • 4 tablespoons butter
  • 1 pound uncooked medium shrimp, peeled, devained, and rinsed (If you don’t have fresh then frozen is also totally fine. Just be sure it’s thawed before adding.)
  • 1 cup Italian parsley, roughly chopped
  • 3 lemons, zested and juiced
  • 1 teaspoon salt
  • ½ teaspoon pepper
  • ½ teaspoon red pepper flakes
  • 1 cup freshly grated Parmesan cheese

Directions:

Bring a large pot of salted water to a boil. Add the linguine and cook until al dente. Drain pasta, reserving 1 cup of liquid.

In a skillet over medium-high heat, sauté onion and garlic in olive oil for several minutes, until softened. Add butter and ¾ cups of parsley and heat until  butter is melted.

Garlic, onion, parsley

Add shrimp and sauté for 3-5 minutes or until shrimp is cooked.

Shrimp

Add cooked pasta and pasta water and toss.

Add water

Add lemon juice and zest, salt, pepper, red pepper flakes, and ¾ cups of Parmesan cheese and toss until well incorporated.

Lemon Zest

Lemon Zest and juice

Serve onto two large plates and garnish with remaining parsley and Parmesan.

Plated Lemon Shrimp Linguine

Chicken Verde Enchiladas

Chicken Verde Enchiladas are a super easy recipe that is deliciously creamy, satisfying, and kid-friendly. This is my go-to recipe to whip up when a friend has a baby or I’m asked to bring a main dish for a potluck. It transports easily and freezes and reheats so well. It’s also a great recipe for using up any leftover cooked chicken you have.

Plated Enchiladas


Chicken Verde Enchiladas
Makes 8 enchiladas

Ingredients:

  • 2 tablespoons olive oil
  • 1 small onion, diced
  • 1 cup mushrooms, diced
  • 4 garlic cloves, minced
  • 1 1/2 cups chicken, shredded
  • 3 cups cheddar cheese, divided
  • 1/2 cup sour cream
  • 1 (15.8 ounce) can Great Northern beans
  • 1/2 teaspoon pepper
  • 1 (10.7 ounce) can cream of mushroom soup
  • 1 cup salsa verde (Find in the salsa aisle or Hispanic foods section of your supermarket)
  • 8 flour tortillas, taco size

Directions:

Preheat oven to 350°F.

In a medium-high heat skillet, sauté onions and mushrooms in olive oil for several minutes, until softened. Add minced garlic and cook for 1-2 minutes and remove from heat. Set aside.

Grilled onions, mushrooms, garlic

In a medium bowl mix together shredded chicken, 1 cup of the cheddar cheese, sour cream, beans, and pepper. Add the grilled onion and mushroom mixture and mix together. Set aside.

Filling

In another bowl, mix together cream of mushroom soup and salsa verde until creamy.

Salsa Verde

Spread a cup of the mixture onto the bottom of a 9×13 casserole dish.

Casserole

Liberally fill each tortilla with the chicken mixture.

Filled tortilla

Roll up and place in the bottom of the casserole dish. Continue with remaining tortillas and filling mixture.

Enchiladas without sauce

Pour remaining mushroom soup/salsa verde mixture all over the filled tortillas.

Enchiladas without cheese

Top with remaining 2 cups of cheddar cheese.

Cheese on enchiladas

Bake for 30 minutes or until cheese is bubbly and starts to brown.

Finished enchiladas

Let cool for 10 minutes and serve.

Plated Enchiladas

Honey-Glazed Ham

I love a honey-glazed ham over the holidays so when I see hams go on special at my supermarket I’ll scoop one up and do a mini-holiday in between Easter and Thanksgiving. Why wait? I don’t go too crazy–honey-glazed ham, mashed potatoes, and a veggie and  scrumptious Sunday dinner is served. While a pre-glazed and pre-sliced ham is nice and easy, buying a whole ham saves a lot (I paid just $10 for a 7-lb ham) and means you can stud it with cloves and make your own simple and tasty glaze. The most time-consuming part of this ham recipe is definitely studding of the cloves so if you have little ones around then this is the perfect job for them.

Helpful Tip: Whole cloves can be pricey if you look for them in the regular spices section. Check out your Hispanic or International foods section in your grocery store and you should see they are much cheaper ($2 vs. $5)!

whole finished ham

Honey-Glazed Ham

Ingredients:

  • 1 whole, fully-cooked ham (Keep in mind that ham will cook 17 minutes per pound)
  • 1/3 cup whole cloves

Honey Glaze:

  • 2/3 cup butter
  • 1 cup honey
  • 1 cup brown sugar
  • 1/4 cup lime juice
  • 1/4 teaspoon cinnamon

Preheat oven to 325°F.

Preparing the glaze:

In a medium saucepan, melt the butter and add the remaining ingredients.

glaze

Bring to a boil and then reduce to a simmer while you prepare the ham.

Preparing the ham:

With a pairing knife, deeply score your ham with long criss-crossing stripes, at least an inch deep.

scored ham

Where the points meet, stud with a whole clove, until the entire ham is covered with cloves.

cloved ham

Remove glaze from heat and glaze ham liberally, reserving some to continue glazing while ham is cooking.

glazed ham

Bake in oven 17 minutes per pound, glazing every 25 minutes or so. Prior to removing the ham, turn on the broiler and broil for 3-5 minutes (keeping a very close eye!) to let the ham and glaze get nice and crispy.

whole finished ham

Remove ham from oven and rest about 10 minutes prior to serving.

Plated ham


Cherry White Chocolate Chip Waffles

I love waffles, whether for Saturday breakfast or even dinner during the week. I was sort of at a loss as to what I was craving for dinner so asked Tom to pick. He voted on my waffles, which instantly sounded great. Instead of my plain waffles (which are pretty awesome I have to admit) I decided to add a little pizazz and see what happened. I had some dried cherries and white chocolate chips on hand so decided to throw them in the batter. They turned out great! The cherries add a tartness that contrasts really well with the sweetness of the chocolate chips and syrup. So good and so going at the top of the list for future waffle nights.

Plated waflfes

Cherry White Chocolate Chip Waffles

Ingredients:

  • 2 eggs
  • 1 1/2 cups warm milk
  • 1/3 cup butter, melted
  • 1/2 cup sugar
  • 2 teaspoons vanilla extract
  • 2 cups all-purpose flour
  • 1 teaspoon salt
  • 4 teaspoons baking powder
  • 1/2 cup white chocolate chips
  • 1/3 cup dried cherries

Directions:

In a large bowl, whisk together eggs, milk, butter, sugar, and vanilla extract. Sift in the flour, salt, and baking powder, and whisk until smooth. Add white chocolate chips and dried cherries.

Batter

Pre-heat your waffle iron and spray with non-stick spray. Ladle batter onto the waffle iron.

Loaded waffle maker

Note: Cherries and chocolate chips will tend to sink to the bottom so be sure to give the batter a good stir and scoop up from the bottom each time you load the waffle maker.

Cook waffles until golden brown and crispy. Serve plain or with butter and maple syrup.

Crispy Waffle

Helpful Tip: Set your oven to the warm setting and place a cookie sheet in the oven while you’re making waffles. Just pile up the waffles on the cookie sheet and then the whole stack will be nice and warm when it’s time to serve.

This recipe is super easy and I often double it so I can freeze extra waffles. Just pop a frozen waffle in the toaster and you’ve got a quick and tasty breakfast.

Plated waffles

Chicken Tostadas

I love TexMex and try to make it a TexMex night at least once a week. Chicken Tostadas are super tasty and a quick and easy dinner option. Paired with a guacamole salad or fiesta rice, a flavor-packed TexMex dinner can be on your table in 30 minutes or less! I always make extra of this tasty filling to have for lunch the next day, wrapped up in a burrito or as a taco salad.

chicken tostadas

Chicken Tostadas
Makes 12 chicken tostadas

Ingredients:

  • 2 tablespoons olive oil
  • 8 ounces of boneless, skinless chicken, cut into bite-sized pieces
  • 1 small onion, diced
  • 4 garlic cloves, minced
  • 1 cup chunky salsa
  • 1/2 packet taco seasoning
  • 1 16 ounce can refried beans
  • 12 tostada shells
  • 1 large tomato, diced
  • 8 ounces Mexican blend shredded cheese
  • 8 ounces sour cream
  • 1 jalapeño, diced optional

Directions:

Add olive oil to a skillet over medium-high heat and sauté chicken and onion for 2-3 minutes or until chicken is mostly cooked but still a little pink.

Chicken and garlic

Stir in garlic cloves, salsa, and taco seasoning and cook for an additional 5 minutes to finish cooking the chicken and for the sauce to thicken.

Salsa chicken

Remove from heat.

In a microwave-safe bowl, heat the refried beans.

To assemble tostadas, spread a thin layer of beans on a tostada shell.

Beans on tostada

Add a few spoonfuls of the chicken mixture.

Chicken on tostada

Finish by topping with cheese, tomato, sour cream, and jalapeño. So easy and so yummy!

chicken tostadas